Solution under constuction
Evidences:
- Dog's fur
- Fingerprints
- Pack of cigarettes
- Dog's fur is red herring. You can learn it by talking to wife and cook => victim had a dog so it's natural for him to have dog's fur on his clothes.
- Fingerprints eliminate cook as a suspect. His fingerprints are not present on candlestick, as seen in the report.
- Pack of cigarettes eliminate wife as she doesn't smoke.
2 remaining suspects are: Business partner and Friend. You can eliminate Business Partner when you ask him about proof of innocennce. Business partner will tell you he can't lift the candlestick. So Friend is the killer.
**************************************
This is solution to my LudumDare 37 game.
In case you wanted to play:
http://ludumdare.com/compo/ludum-dare-37/?action=preview&uid=34334
niedziela, 11 grudnia 2016
czwartek, 10 marca 2016
Creek puzzle solver
Time: 4-5 days
- Original request
- Download
- How to Use
- Creek puzzle
- Algorithm - data structure
- Algorithm - satisfying the numbers on line crossing
- Algorithm - callback
- Single area check
Original request
The project was done for functional programming ([SPOP]) course on my university. The task was to write Creek puzzle solver using Haskell. Project is console only.
Download
Dropbox
How to use
- Unpack zip.
- Click on "projekt_SPOP" file in folder.
- After loading the file type "go" in command line.
- Text "Podja nazwe pliku z rozszerzeniem" appears.
- Type in the name of file you want to solve for example "1.txt". It is obligatory to add ".txt" at the end.
- Program displays contents of the file
- Program displays "parsowanie poprawne" if the text file is in a correct format.
- Type "yes" to solve the puzzle
Once solved command line displays solution with 0 marked as empty boxes and 1 marking the filled boxes. Solver is meant for puzzles with small dimensions.
In order for program to use puzzle must be defined in specific format. Folder contains puzzle examples. The format is specified as:
"Creek (height dimension, wide dimension) [(( record, column), number on the line-crossing), ...] "
Program has only minor input data control so it's up to the user to provide proper data. Numbering of records and columns start from 0.
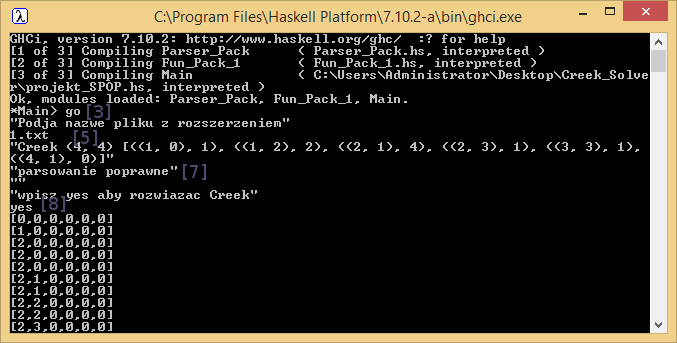
How-to-use as seen in the command line
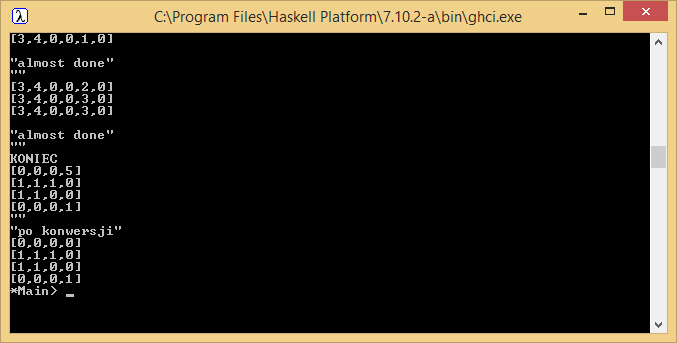
Solution displayed in console
Creek puzzle
The task in a Creek puzzle is to fill boxes. In order for solution to be legal following criteria must be met:
- Number in the crossing determines how many filled boxes must be in the neighbourhood of the number
- Unfilled boxes must create one area
- Filled boxes don't need to be forced to be filled by numbers in the crossing

Example of solved creek puzzle
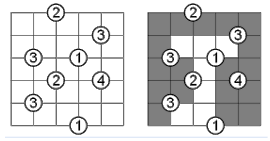
Example of solved creek puzzle with box being filled without being forced by number in the crossing (the upper left corner)
Algorithm - data structure
Warning: while the algorithm itself is easy to understand it's difficult to explain. I hope given examples makes things easier to understand. If you feel any part needs more explaining be sure to ask.
In order to solve Creek puzzle backtracking algorithm was used. It's a little smarter version of brute-force. Firstly program seeks to set filled boxes in such way that numbers in the line crossings are satisfied. Once this is achieved program checks if 0s make one area. If yes then solution has been found otherwise the new field with properly field boxes is being searched.
The field is represented by list of lists. The field contains 3 values:
- 5 - box is neither filled nor empty
- 0 - box is empty as forced by number in the crossing
- 1 - box is filled as forced by number in the crossing
At first field is filled with 5s.
What the program is trying to do is to put the neighbourhood of the number in the crossing (called archetype in the program) into the field when it's legal.
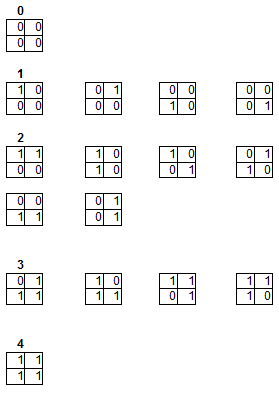
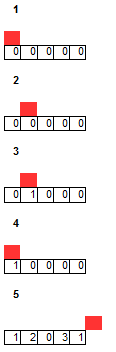
Archetypes for different numbers in the line crossing (bold) - 1s mark filled box, 0 mark empty box
It's ok to insert archetype into the field when numbers in the archetype match numbers on the field or the number on the field is 5 (box can be both empty and filled). If number in the box is 5 after putting archetype on board the value must be changed to the numbers forced by archetype. This is because the number on the crossing forces the boxes in its neighbourhood to be either filled or empty.
 Example of legal putting archetype with 3 in the line crossing in the red spot: Top example shows putting first archetype (since field is filled with 5s only), bottom example shows putting the second archetype. It's ok to put archetype since there is no conflict between 1s already on the field (forced by 2 in the crossing) and 1s and 0s of archetype about to be put. Right side shows field after archetype being applied.
It is illegal to put archetype into the field when:
- 1s are outside of the field as you can't fill boxes that don't exist
- 1s and 0s of archetype about to be put don't match with 0s and 1s already on board

Illegal move (red) - 1s outside of field

Illegal move (red) - right bottom 0 of archetype doesn't match 1 that is already on board
Algorithm - satisfying the numbers on line crossing
In order to satisfy the numbers in the line crossing program uses special list and a number variable. List stores which archetypes has been put in the field. Number variable keeps index which number in the crossing is being put at the current moment. Information about what is the value of the number in the crossing is kept in another structure along with coordinates (parsed text file data).
List with number variable (red) at different stages of program
- Start of algorithm - first number on the crossing is being placed with 0th archetype (
- for 0 in the crossing that would be (0,0;0,0)
- for 1 (1,0;0,0)
- for 2 (1,1;0,0)
- for 3 (1,1;1,0)
- for 4 (1,1;1,1)
- for 0 in the crossing that would be (0,0;0,0)
- 0th archetype for first number on the crossing was legal and has been put in. Program moves on to putting the second number on the crossing
- Archetype with index 0 for second number in the crossing was illegal so program tries out archetype with index 1
- Program tried out all archetypes for second number and none of them was legal. Program performs callback - it forces the previous number in the crossing to change it's archetype. If for previous number it was the last available archetype (so there are no more archetypes available) the previous archetype callback forcing the change of archetype on the pre-previous number. This goes until some number have archetypes available.
- Program ends when number variable is pointing at position outside of the list. All numbers in the crossings have been satisfied. On the other hand if it's impossible to find legal archetype for first number in the crossing it means solution doesn't exist.
Algorithm - callback
Multi-callbacks example
Program tries to put 5th number on the line crossing with value 3 on the crossing. This is illegal due to upper-left corner (0 in the field and 1 in the archetype). It's the last archetype available for number 3 so callback is performed. Blue numbers show the order at which numbers were placed. 4th number can't change archetype because it is out of archetypes so it calls callback. 3rd is out as well so it callbacks. 2nd number has some archetypes available so callback stops there.
Callback forces to change field so that only numbers on the left from the red square are applied. This is done by generating new field with 5s only and applying the archetypes of number in the crossings only to the left of the red square. In this example. Only archetype with index 2 for number 1 on crossing is applied to the field.
The bottom picture shows which archetype will be tested in the next iteration (after callbacks) and for which number.
Single area check
After program satisfies numbers in the cross lines constrain it needs to check if 0s make single area. It is done using grow region algorithm. If you need further reading on grow region algorithm you can go to wikipedia or 4th part of my Zerg infection guide (as it works similar).
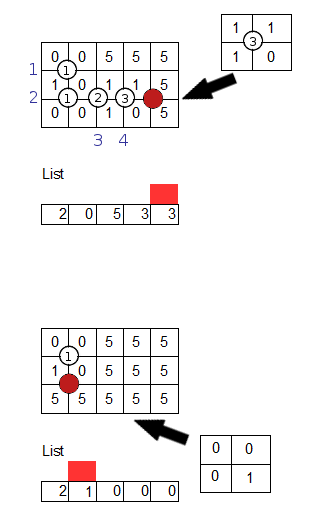
The idea for checking if 0s make up a single region is to change 0s into 1s starting from single 0 and at the end checking if there are any 0s left. At first a 0 is picked from the field - any 0 will do. That box is added to the list and its value is changed to 1. List contains 1s that will check neighbourhood for 0s and 5s to change into 1. We consider 5s because they can be both 0s and 1s - they can serve as a bridge between 0s. We need to make a copy of the field as original will be needed later.
In each iteration head of the list is picked. For the box from the head neighbourhood of the box is checked in search of 0s and 5s. If there are any they are changed into 1s and added to the list. Head of the list is then removed. Algorithm does it until there is something in the list.

Single area check algorithm in a pictures
Once algorithm is done program counts number of 0s in the field. If count is equal to zero that means 0s make a single area, with possible 5s serving as bridges. Program again does the region grow this time changing 0s into 7s. This shows which 5s are supposed to be turned into 0s. After it is done 7s are turned into 0s and 5s(not serving as bridges) into 1s. Print the solution and be happy.
If count of 0s is bigger than 0 this means that potential solution doesn't meet single area criteria. In this case solution is ignored. Red square is moved to the last position in the list. New field is created and then all archetypes of numbers in the crossing lines are applied except the last one. Index for last number is increased by one or callback is called if required. All these actions can be summarized as a callback called from the extra number if list had one more number.
Thank you for reading. If you have any questions be sure to ask on Newgrounds, Twitter or in the comments below.
Tags: Creed, puzzle, sudoku, solver, Haskell, functional programming, logical
poniedziałek, 22 lutego 2016
Interactive Presidential Election financing map
Return to the top
Time: 10-14 days
Original request
The project was done for Social Networks ([TASS]) course on my university. The task was to represent financing of candidates as a map in a neat way. The map was supposed to allow the user to choose between individual contributions and contributions via political committees. The choice of elections was left up to the student so I picked 2012 national election.
I chose to do project in Unity3D because it was a lifeboat for me. Originally I planned to use Google Maps API but since it requires JavaScript and I was too short on time to learn it I went for tools I've used before - Unity3D.
Video
Download
https://www.dropbox.com/s/51zj9lsg13iuu9c/TASS_Unity.rar?dl=0
Warning: Code is a complete mess so if you decide to open it in order to analyze it you are doing it on your own risk. For in this code dragons and tentacle monsters await to do unspeakable things to you.
How to use
Project can be only viewed in Unity window. It can't be exported to exe. This is due to using standard C# reading data method instead of Unity reading method.
After opening the project there should be one object called "Master" on the scene. If it isn't there open scene <scene_1>.
After pressing "play" user sees "Main view".
 Main view
GUI:
Clickable:
Object details:

State view
"State view" is similar to "Main view". Changes involve:
Components
In order to make the project work it was needed to prepare set of data and scripts.
Data:
Scripts:
Map building
Firstly the map with no marker was downloaded. This map serves as a background. Then for each state there was downloaded an image with single red marker pointing at state. In order to know where to place chart objects in Unity3D we need to use proportion. For each image with marker the position of the peak of the marker is found and saved in a text file. In addition we know the width and height of the image (in pixels) and the width and height of the image in Unity position units (using bound.size).
Sidenote: marker used are reds because they stand out from green-blue colours used in map. While searching from peak of the marker scripts start from bottom right and goes up. This makes sure that first pixel that is red enough is the peak of the marker
 Background image
 Image with Louisiana marked

Piece of text file used for positioning charts on USA map. Format of lines: <x pixel position of peak>, <width of image>, <y pixel position of peak>, <height of image>
 Proportions for chart position explained. Only "x position in Unity" is unknown.
In order to display right image (the image of picked state and not any of other ones) in the "State view" function "Resources.LoadAll<Sprite> ()" was used.
Click on self
Before I switched to Unity I was working in Stencyl. Stencyl has a nice event called "When pressed on self" which triggers event whenever a player pressed mouse while on the sprite of the Game object. I know that in Unity this is usually done by using raycasting. Since I'm not yet familiar with raycasting and I felt comfortable with using Stencyl thinking I wrote Unity version of "When pressed on self".
Code is realized by "OnClickScript" script.
How it works:

The reason why "ignite" function takes corners (green points) and not sprite as argument is because by giving corners user can click on any place between the corners, even space between the bars, and it will still trigger a function.
Setting <clickable> as false can temporary disable the script. This is useful when user switches to "State view". States charts are only made invisible (they are not destroyed) but in order not to make something stupid clicking invisible objects must be disabled. That's when setting <clickable> as false comes in.
Scaling the bars (the right way)
Hierarchy of chart object:
RedGuardian - used for scaling
BlueObject and RedObject are placed in such way that the bottom of the bar is at the centre of BlueGuardian and RedGuardian objects. This is important because we want bars to grow and not scale along their centre.

Point shows the centre of BlueGuardian. Blue bar(BlueObject) is placed so it's bottom is at the centre of BlueGuardian.

Scaling explained: 1 - chart object; 2- BlueObject with scale y=2, not really what we want; 3 -BlueGuardian with scale y=2, exactly what we wanted
Problems
While making the project several things made my life more difficult.
Data parsing:
Static Google maps:
This can be very tricky. If you ask for place not detailed enough you can get strange results. Asking for "USA+LA" gives Laos. Asking for "Washington+USA" gives Washington D.C. and not the state of Washington. In some cases the marker can be placed out of the picture. While using static Google maps be sure to check if there is actually marker on the map.
Negative contribution:
I don't know how does it work but in the contribution data there are records which have negative values. These data have been omitted.
There were others problems as well but they were more kind of one time thing that something that was causing trouble through the project. Of course you can deal with these problems but while being overworked and tired dealing with random commas is something extremely irritating.
Thank you for reading. If you have any questions be sure to ask on Newgrounds, Twitter or in the comments below.
Tags: Election, map, static, Google, 2012, maps, FEC, presidential, president, vote, campaign, contribution, financing, money, Obama, Barrack, Mitt, Romney, finance, support, Republican, Democrat, API
Time: 10-14 days
- Original request
- Video
- Download
- How to use
- Components
- Map building
- Click on self
- Scaling the bars (the right way)
- Problems
Original request
The project was done for Social Networks ([TASS]) course on my university. The task was to represent financing of candidates as a map in a neat way. The map was supposed to allow the user to choose between individual contributions and contributions via political committees. The choice of elections was left up to the student so I picked 2012 national election.
I chose to do project in Unity3D because it was a lifeboat for me. Originally I planned to use Google Maps API but since it requires JavaScript and I was too short on time to learn it I went for tools I've used before - Unity3D.
Video
Download
https://www.dropbox.com/s/51zj9lsg13iuu9c/TASS_Unity.rar?dl=0
Warning: Code is a complete mess so if you decide to open it in order to analyze it you are doing it on your own risk. For in this code dragons and tentacle monsters await to do unspeakable things to you.
How to use
Project can be only viewed in Unity window. It can't be exported to exe. This is due to using standard C# reading data method instead of Unity reading method.
After opening the project there should be one object called "Master" on the scene. If it isn't there open scene <scene_1>.
After pressing "play" user sees "Main view".
Main viewGUI:
- Map of USA with charts objects
- Panel for choosing types and size of contributions
- Panel for choosing the visible states charts
- Panel showing information about clicked state
- Code of clicked state
- Button allowing to go to the "State view"
Clickable:
- Charts objects[1] - After clicking a chart, panel [5] displays detailed information about financing in the state. Financing criteria are based on tick-boxes in panel[2]. Click bars or space between them (not the text below).
- Tick-boxes in panel[2] - Allows to choose which contributions will be used. It is allowed to choose size of contributions (small, medium, big, huge) and source of contribution (individual or authorized committee).
- Tick-boxes in panel [3] - allows to enable or disable display of charts.
- Button [6] - allows to go to the "State view"
Object details:
- Charts - Two bars represent financing for each candidate (blue - Obama, red - Romney). Height of bars is proportional to the contributions gathered. Under the chart there is a text with code of the state and percentage share of contributions (first number is for Obama).
- Tick-boxes in panel[2] - tick-boxes allow to restrict what kind of contributions will be used for the map. Based on single contribution size they are classified as: small (0-250$), medium(250$-500$), big (500-1000$), huge (1000$++)
- Panel [4] - at first it doesn't show any information (marked as YY/YY). After clicking a state chart panel fills up with financing data in a state. Four rows <number>/<number> display information about how big percent make contributions of given size in reference to total of contributions. First number refers to Barrack Obama, second to Mitt Romney. Information is filtered according to the tick-boxes in panel [2]. If there is an error (tick-boxes filters all data) XX/XX is displayed.
State view
"State view" is similar to "Main view". Changes involve:
- Chart for the biggest cities are displayed instead of charts of the states - cities were chosen from the list of 300 biggest cities in USA. There is a limit of 6 cities per state.
- Panel [7] - represents contributions in areas that weren't covered by the cities
- Button[8] - allows to switch to "Main view"
Components
In order to make the project work it was needed to prepare set of data and scripts.
Data:
- FEC csv files - 4 table containing as records single contributions. Separate files for individual and authorized political committees for 2 candidates (Barrack Obama and Mitt Romney).
- Static Google map API - generates map image based on html request. Allows to set zoom, resolution, markers. API can get location either from geographical coordinates or from names (for example "AK+state+USA").
- List of 300 biggest cities in USA (wikipedia)- needed for choosing cities in the "State view". Cities were limited to 6 per state.
- Sorted list of states by total area (wikipedia) - order determines the zoom. Smaller states require bigger zoom
Scripts:
- Java script for data aggregation - summing up records by size of contribution and location (city/state)
- Java script for downloading maps - project requires one map serving as a background and series of maps with a single marker for finding states/cities
- Java script for finding red marker location - scripts finds the peak of the marker in the image
Map building
Firstly the map with no marker was downloaded. This map serves as a background. Then for each state there was downloaded an image with single red marker pointing at state. In order to know where to place chart objects in Unity3D we need to use proportion. For each image with marker the position of the peak of the marker is found and saved in a text file. In addition we know the width and height of the image (in pixels) and the width and height of the image in Unity position units (using bound.size).
Sidenote: marker used are reds because they stand out from green-blue colours used in map. While searching from peak of the marker scripts start from bottom right and goes up. This makes sure that first pixel that is red enough is the peak of the marker
Background image
Image with Louisiana marked
Piece of text file used for positioning charts on USA map. Format of lines: <x pixel position of peak>, <width of image>, <y pixel position of peak>, <height of image>
Proportions for chart position explained. Only "x position in Unity" is unknown.In order to display right image (the image of picked state and not any of other ones) in the "State view" function "Resources.LoadAll<Sprite> ()" was used.
Click on self
Before I switched to Unity I was working in Stencyl. Stencyl has a nice event called "When pressed on self" which triggers event whenever a player pressed mouse while on the sprite of the Game object. I know that in Unity this is usually done by using raycasting. Since I'm not yet familiar with raycasting and I felt comfortable with using Stencyl thinking I wrote Unity version of "When pressed on self".
Code is realized by "OnClickScript" script.
How it works:
- Object is created
- Object is assigned a sprite
- Object calls "ignite" function giving as parameters coordinates of left top and right bottom corners of sprite. Coordinates in Unity position units.
- For object <mode> variable is set. This says which function will trigger upon clicking on the object.
- When mouse is clicked mouse position is translated from pixels to Unity position units. If object is clickable (as marked by <clickable> bool variable) and mouse is inside the rectangle ("created" during "ignite call") the function is called. The choice of function is based on <mode> variable.
The reason why "ignite" function takes corners (green points) and not sprite as argument is because by giving corners user can click on any place between the corners, even space between the bars, and it will still trigger a function.
Setting <clickable> as false can temporary disable the script. This is useful when user switches to "State view". States charts are only made invisible (they are not destroyed) but in order not to make something stupid clicking invisible objects must be disabled. That's when setting <clickable> as false comes in.
Scaling the bars (the right way)
Hierarchy of chart object:
- chart - main object
- TextObject - contains text under chart
- BlueGuardian - used for scaling
- BlueObject - blue bar
- RedObject - red bar
BlueObject and RedObject are placed in such way that the bottom of the bar is at the centre of BlueGuardian and RedGuardian objects. This is important because we want bars to grow and not scale along their centre.
Point shows the centre of BlueGuardian. Blue bar(BlueObject) is placed so it's bottom is at the centre of BlueGuardian.
Scaling explained: 1 - chart object; 2- BlueObject with scale y=2, not really what we want; 3 -BlueGuardian with scale y=2, exactly what we wanted
Problems
While making the project several things made my life more difficult.
Data parsing:
- In the csv file if column in form of "\" would make the program unresponsive.
- A lot of random dots, commas, spacebars in places where they shouldn't be
- For the "State view" there was a need to generate pictures with state as background and the marker on the single city. Name of the images must have described what was in the picture. Using spacebar was confusing as you don't know whether you mean spacebar as separation between city and state or separation between two words of the state (New <spacebar> York). In the end the naming convention was <state with "_" as separator if name of the state had more than one word in name> "+" < city with "_" as separator if name of the city had more than one word in name>
Static Google maps:
This can be very tricky. If you ask for place not detailed enough you can get strange results. Asking for "USA+LA" gives Laos. Asking for "Washington+USA" gives Washington D.C. and not the state of Washington. In some cases the marker can be placed out of the picture. While using static Google maps be sure to check if there is actually marker on the map.
Negative contribution:
I don't know how does it work but in the contribution data there are records which have negative values. These data have been omitted.
There were others problems as well but they were more kind of one time thing that something that was causing trouble through the project. Of course you can deal with these problems but while being overworked and tired dealing with random commas is something extremely irritating.
Thank you for reading. If you have any questions be sure to ask on Newgrounds, Twitter or in the comments below.
Tags: Election, map, static, Google, 2012, maps, FEC, presidential, president, vote, campaign, contribution, financing, money, Obama, Barrack, Mitt, Romney, finance, support, Republican, Democrat, API
piątek, 19 lutego 2016
Love me, Hate me, Twitt me
I've set up a twitter. Yay! Be sure to twitt me or follow me. It's nice to see that this blog is getting through to the people.
https://twitter.com/T4Upl

https://twitter.com/T4Upl
Path-finding using sensors
Time: 5-7 days
The project was done for Multiagents Systems ([WSD]) course on my university. Students were given a lot of freedom in both choice of tools and interpretation of topic. The bottom line was to develop a product that could be used to support people lost in the main hall who are searching for their classrooms.
The only restriction was that a final product must be a multiagent system - many independent units working for themselves but somehow through their actions in the end solving the given problem. This restriction made use of typical pathfinding algorithms such as A* impossible because they involve using maps. Using maps means looking at the problem as an integrated whole and not through the eyes of a single agents which have limited field of view.
The idea was to create network of sensors in the building which would be able to communicate with each other and humans (via mobile phone application). There are two types of sensors:
The project was done only as virtual prototype, some of the real life rules were adjusted to suit virtual environment.
From user perspective this project works like this:
https://www.youtube.com/watch?v=yFXdF8JTAHg
Video presents older version. Minor changes have been made.
https://www.dropbox.com/s/cxaw7izk4k2dy8l/WSD.rar?dl=0
Warning: Code is messy so if you decide to analyze it you are doing it on your own risk.
Controls:
Clickable objects:
At first sensors ask other sensors if they are close enough to be recognized as neighbours. Sensors keep the list of its neighbours. Each sensor is given unique ID but human user can ask only for location of blue sensors. Mobile applications are given ID upon being downloaded to the mobile phone.
Communication is based on exchanging information packets (yellow and purple circles). There are two types of movements in the network: outgoing(yellow) and gathering(purple).
In outgoing communication packets are trying to get to the searched classroom. The information is send to all neighbouring sensors unless that sensor had this packet before. Checking if sensors had the packet before prevents occurrence of endless loops. Upon getting to the destination sensor, packet is killed and packet's information is placed in sensor's message queue. Once in a while sensor gets message from queue, sends packets to neighbours then removes message from queue.
If packet found searched classroom the packet changes from outgoing to gathering packet and returns to the human the same way it was outgoing. To achieve this the list of visited sensors ID is copied. Packet follows the list from the end removing the IDs from the rear of one of the lists. The second list keeps the path towards the searched classroom. Once packet gets to human the path is added to the list of paths kept by mobile application.

Start view. Human is looking for classroom with ID=5.

Human in range so the outgoing packet is being sent. Application adds application ID to the list. "I" is added in front of ID to mark it as application ID and not classroom ID.

Packet reached its destination. Packet dies and puts its information into message queue of sensor. Sensor adds its ID to the list.

Sensor picks message from queue and sends outgoing packets to all sensor in range that aren't in the list. Only sensor with ID=2 matches.

Packet reached its destination. Packet dies and puts its information into message queue of sensor. Sensor adds its ID to the list.

Sensor picks message from queue and sends outgoing packets to all sensor in range that aren't on the list. Sensors with ID=3 and ID=6 match. Sensor with ID=1 is in range but its ID is on the list so the sensor doesn't send packet to it.


Packet reached its destination and it was the searched classroom. Information in the list marks that upon getting the message from the list sensor is going to send gather packet instead of outgoing packet.


Packet reached its destination. Packet dies and puts its information into message queue of sensor. Sensor adds its ID to the list. Upon receiving message from queue sensor won't be able to send outgoing packet to any of the neighbours. This way outgoing packets who went the bad way die off.

Sensor picks message from queue. Message contains information that it should be gathering packet. Since its creation of gathering packet the list is copied. First list is used to return to the human who send the request. Second list (copy) keeps the path from human to the searched classroom. Sensor picks sensor ID as last element from the list and sends gathering packet toward that sensor.

Gather packet reached its destination. Packet dies and puts its information into message queue of sensor. Sensor removes last element.

Sensor picks message from queue. Message contains information that it should be gathering packet. Sensor picks sensor ID as last element from the list and sends gathering packet toward that sensor.


Sensor picks message from queue. Message contains information that it should be gathering packet. List contains only one element meaning it is supposed to be send to the human and not a sensor. Sensor checks if there is human in range with ID equal to the single element in list. Upon reaching the human gather packet puts a copy of list (path to the searched classroom) into human mobile application.
The project is working but would be very expensive to implement in real life. It would require a lot of rather complicated sensors (two way communication, adding IDs to the list). It would be much better idea to have sensors that only send out information to the mobile application informing it about current position of a human. Then application using built-in map of the building would be able to find the path to the searched classroom from current location. Due to subject of the course this solution wasn't allowed.
If you have any questions be sure to ask on NG, twitter or in the comments below.
Original request
The project was done for Multiagents Systems ([WSD]) course on my university. Students were given a lot of freedom in both choice of tools and interpretation of topic. The bottom line was to develop a product that could be used to support people lost in the main hall who are searching for their classrooms.
The only restriction was that a final product must be a multiagent system - many independent units working for themselves but somehow through their actions in the end solving the given problem. This restriction made use of typical pathfinding algorithms such as A* impossible because they involve using maps. Using maps means looking at the problem as an integrated whole and not through the eyes of a single agents which have limited field of view.
Idea
The idea was to create network of sensors in the building which would be able to communicate with each other and humans (via mobile phone application). There are two types of sensors:
- blue - they represent the classrooms
- green - they exists so that network would be fully connected
The project was done only as virtual prototype, some of the real life rules were adjusted to suit virtual environment.
From user perspective this project works like this:
- Human stands next to the sensor of a classroom
- Human tells mobile application what classroom is being searched
- Application contacts with sensor giving it task to find a classroom
- Sensors contact among themselves to find the way to searched classroom
- Sensor return paths to the classroom, the longer the human waits the more paths to the searched classroom they will get
Video
https://www.youtube.com/watch?v=yFXdF8JTAHg
Video presents older version. Minor changes have been made.
Download
https://www.dropbox.com/s/cxaw7izk4k2dy8l/WSD.rar?dl=0
Warning: Code is messy so if you decide to analyze it you are doing it on your own risk.
How to use
Controls:
- Arrows - Control of active human
- "=" - Start searching for the classroom
- "o" - Switch active human
- "p" - pause
- Editable text field in top left corner - write ID of classroom you want to find
Clickable objects:
- human - prints its ID, number of paths to the searched classroom and paths to the searched classroom
- outgoing packet - prints ID of classroom searched, list of sensor IDs already visited, ID of sensor where it's going
- gather packet - prints list of sensor IDs that packet visited as outgoing packet, list of sensor IDs that are yet to be visited before returning to player
- sensor (blue and green) - prints number of neighbours and neighbours IDs
How does it work
At first sensors ask other sensors if they are close enough to be recognized as neighbours. Sensors keep the list of its neighbours. Each sensor is given unique ID but human user can ask only for location of blue sensors. Mobile applications are given ID upon being downloaded to the mobile phone.
Communication is based on exchanging information packets (yellow and purple circles). There are two types of movements in the network: outgoing(yellow) and gathering(purple).
In outgoing communication packets are trying to get to the searched classroom. The information is send to all neighbouring sensors unless that sensor had this packet before. Checking if sensors had the packet before prevents occurrence of endless loops. Upon getting to the destination sensor, packet is killed and packet's information is placed in sensor's message queue. Once in a while sensor gets message from queue, sends packets to neighbours then removes message from queue.
If packet found searched classroom the packet changes from outgoing to gathering packet and returns to the human the same way it was outgoing. To achieve this the list of visited sensors ID is copied. Packet follows the list from the end removing the IDs from the rear of one of the lists. The second list keeps the path towards the searched classroom. Once packet gets to human the path is added to the list of paths kept by mobile application.
Start view. Human is looking for classroom with ID=5.
Human in range so the outgoing packet is being sent. Application adds application ID to the list. "I" is added in front of ID to mark it as application ID and not classroom ID.
Packet reached its destination. Packet dies and puts its information into message queue of sensor. Sensor adds its ID to the list.
Sensor picks message from queue and sends outgoing packets to all sensor in range that aren't in the list. Only sensor with ID=2 matches.
Packet reached its destination. Packet dies and puts its information into message queue of sensor. Sensor adds its ID to the list.
Sensor picks message from queue and sends outgoing packets to all sensor in range that aren't on the list. Sensors with ID=3 and ID=6 match. Sensor with ID=1 is in range but its ID is on the list so the sensor doesn't send packet to it.
Packet reached its destination and it was the searched classroom. Information in the list marks that upon getting the message from the list sensor is going to send gather packet instead of outgoing packet.
Packet reached its destination. Packet dies and puts its information into message queue of sensor. Sensor adds its ID to the list. Upon receiving message from queue sensor won't be able to send outgoing packet to any of the neighbours. This way outgoing packets who went the bad way die off.
Sensor picks message from queue. Message contains information that it should be gathering packet. Since its creation of gathering packet the list is copied. First list is used to return to the human who send the request. Second list (copy) keeps the path from human to the searched classroom. Sensor picks sensor ID as last element from the list and sends gathering packet toward that sensor.
Gather packet reached its destination. Packet dies and puts its information into message queue of sensor. Sensor removes last element.
Sensor picks message from queue. Message contains information that it should be gathering packet. Sensor picks sensor ID as last element from the list and sends gathering packet toward that sensor.
Sensor picks message from queue. Message contains information that it should be gathering packet. List contains only one element meaning it is supposed to be send to the human and not a sensor. Sensor checks if there is human in range with ID equal to the single element in list. Upon reaching the human gather packet puts a copy of list (path to the searched classroom) into human mobile application.
A word of warning
The project is working but would be very expensive to implement in real life. It would require a lot of rather complicated sensors (two way communication, adding IDs to the list). It would be much better idea to have sensors that only send out information to the mobile application informing it about current position of a human. Then application using built-in map of the building would be able to find the path to the searched classroom from current location. Due to subject of the course this solution wasn't allowed.
If you have any questions be sure to ask on NG, twitter or in the comments below.
Tags: sensor, multiagent systems, Unity, Unity3D, pathfinding, path-finding
środa, 17 lutego 2016
Winter update
Blog neglected
The reason why I've neglected this blog for so long is because I was extremely busy with my university projects. Since I'm having a short between-term break I plan to make posts regarding three of the completed projects this term. Posts will be dealing with over-all how-to-do-it without explaining single lines of code as I used to do in the past. Two projects were done in Unity3D, allowing me to cheat my way out of learning new technologies. Third project was done in Haskell so it less visual but working on the task was still fun nevertheless.
Things to come
1. Path-finding using sensors
2. Interactive 2012 Presidential Election financing map
3. Creek Puzzle Solver

No LD34
Due to lack of time I was forced to give up taking part in LD34. The same goes for Global Gamejam. For both of those events I was 50/50 sure to compete but in the end the outside circumstances forced me to give up on them.
I did however took the trip to the site of Polyjam (Warsaw edition of GGJ). The topic was ritual. While most interpreted topic as either satanic ritual (human sacrifices/ possessions) or shamanic rituals (Aztecs and company) I was pleasantly surprised to find a game about tea making => nice out-of-the-box thinking.
środa, 7 października 2015
#Stencyl: Turn-based strategy
Difficulty: (5/10)
Estimated time of work: 6-8 hours
- Original request
- Video of finished project
- Play me
- Download me
- Project in bullets
- Project review
- Gameflow
- Building the scene
- On-click states
- Battle (Player attack)
- Battle (Enemy attack)
- Help
Original request:
There was no original request per se. The game was made for Ludum Dare 33. I think that this tutorial is a good starting point for anyone who will be trying to create turn based strategy. Tutorial puts focus on battle itself omitting other things like: buying/selling potions, equipping/customizing player and others.
Video of finished project
Play me
You can play finished version on Newgrounds:
http://www.newgrounds.com/portal/view/662557
Download me
You can download finished project from Ludum Dare entry:
http://ludumdare.com/compo/ludum-dare-33/?action=preview&uid=34334
You can download post-LD debugged version here:
http://wikisend.com/download/342412/Frankenstein_30_09
Project in bullets
- Player picks action: attack or potion use.
- There are 3 types of attacks: Normal, Strong, Special.
Normal attack deals standard damage within +/- 25% range.
Strong attack is like normal attack but it deals 150% damage of what normal attack would deal. Strong attacks has 75% hit chance (25% for missing and dealing 0 damage).
Special attack consumes 15 energy to perform attack. Special attack has 25% to deal double damage otherwise its standard attack.
- If attack is chosen: player moves toward enemy and once he is close enough he hit them dealing damage based on attack type. After attack player returns to his starting position If enemy survives he attacks.
- Stats of enemy - health and attack power are based on level picked by player.
- Player and enemy attack each other in one-then-switch fashion until one of them dies. After this happens a pop-up menu appears informing about result of the battle
- On the screen after attack appears text informing how much damage has been dealt, was special successful etc.
Project review
Project isn't really that difficult but it's rather big. Main problem lies in big number of attributes. As there is a lot of things to be coded this project requires to be kept clean otherwise it will turn into huge mess.
Gameflow
 Diagram shows a flow of the battle
The battle scene was created first so it operates on local attributes. After creating the scene: all buttons, characters etc. battle scene needs to import game attributes into local attributes. Game attributes are set up in map scene. Imported game attributes involve:
- head - type of the head picked for the player
- arm - type of the arm picked for the player
- body - type of the body picked for the player
- potion_health_owned - number of health potions owned
- potion_energy_owned - number of energy potions owned
- potion_attack_owned - number of attack potions owned
- player_energy - maximum energy of player
- level - level currently being played/type of enemy
- player_health - maximum health of player
- player_power - maximum power of player
With so many attributes it's good to underline the rule of attribute naming. With smaller project you would name attributes naturally for example: <health_potions_owned>. However if you do that while dealing with bigger projects at some point you will find yourself in front of the huge list of attributes and then you will realize you forgot how you named your attribute.
So instead use something called "reversed notation". This way you will quickly find the attribute you are looking for: <something with potion?> → <potion> → <what potion?> → <potion_health> → Oh! I named it <potion_health_owned>
Building the scene
Events:
→ combat_scene_behavior → when_created
→ combat_scene_behavior → scene_set_up
→ combat_scene_behavior → animate
→ combat_scene_behavior → level
→ combat_scene_behavior → enemy
Actors in the scene on the start are created in event <scene_set_up>. Second thunder actor, marking enemy energy, can be easily removed from the code. It's leftover from the time when enemies would have used special attacks.
Parts of player and enemy: head, body, arm, circle after being created are stored as actor attributes.
Next we need to set initial state of boolean attributes and deal with importing information from game attributes into the <combat_scene>.

<when_created> handles scene creation
Attributes:
- <in_combat> - out-of-use
- <menu_open> - boolean; false; true if there is open menu (choice of attack or potion)
- <player_turn> - boolean; true; true if it's player turn, must be true if you try to open action menu
- <tips> - text; <empty_text>; displays info about last player's action
- <enemy_text> - text; <empty_text>; displays info about last enemy's attack
Trigger events:
- <animate> - triggers <animate_2>, give enemy(each body part) proper look based on the <level> game attribute
- <level> - animate player, <animate_part> animates actor <temp_actor> based on value of <helper_1> what allows to animate single body part using proper game attribute(head, arm, body). Trigger event <calculate> from behavior <calculate> calculates total health and attack after body parts bonuses. There is a minor mistake in <calculate> event (attack is switched with health) and it's fixed by swapped assignment of combat and health in <level> event.
- <enemy> - set player health and damage based on <level> game attribute

<level> trigger event
Attributes in <created>:
- maximum_enemy_damage - maximum damage enemy can deal
- maximum_enemy_damage - maximum damage player can deal
- minimum_enemy_damage - minimum damage enemy can deal
- minimum_player_damage - minimum damage player can deal
- strong_multiplier - how much strong attack is stronger from normal attack; 1.5=150%
- strong_chance - how much chance does strong attack have to be successful; 75=75%
- special_cost - energy cost of special attack
- energy_enemy - local attribute; set to <max_energy_enemy> from <enemy> event
- energy_player - local attribute; set to <max_energy_player> from <level> event
- hp_enemy - local attribute; set to <max_hp_enemy> from <enemy> event
- hp_player - local attribute; set to <max_hp_player> from <level> event
- special_chance - chance that special attack will do double damage instead of standard damage; 25 = 25%
- special_enemy_cost - leftover from the time when enemies were meant to have special attacks
On-click states
There are two ways how to trigger a on actor click trigger, both are used in the project:
- <on actor click> event
- <on mouse pressed> event + mouse location check
In order to control a gameflow following attributes are used:
- menu_open - boolean; true if menu (attack or potion) is open, prevents from opening menu when one is open, prevents opening menu in the middle of attack
- menu_mode - number; says which menu is open (1=attack, 2=potion, 3=to map, 4=win/lose)
- playerturn - boolean; true if it's player's turn. False during enemy's turn, prevents from opening action menu during enemy's turn.

Gameflow as seen through mouse clicks
Events:
→ combat_scene_behavior → when_the_mouse_is_pressed
→ combat_scene_behavior → open_potions
→ combat_scene_behavior → open_attack
→ combat_scene_behavior → clean_up
→ combat_scene_behavior → menu_open
→ button_behavior → animate_me

Opening attack or potion menu;
Creating menu is triggered by clicking on screen and if player clicked on one of the buttons (attack,item or to map) a proper menu pops up. <when_the_mouse_is_pressed> handles that.
In case of clicking attack or item button an event is triggered <open_attack> or <open_potions>. Each of these events sets up <menu_open> (1 for attack and 2 for item) and then triggers <menu_open>. <menu_open> creates 4 buttons: 3 action buttons + cancel. Button actors are saved in <menu_list>. <menu_open> while creating buttons sets <number> for them so that the actor knows which button is he then triggers <animate_me> which sets up animation for actor based on <menu_mode> and <number>. Menu can only be created when there is no other menu on the screen so there is <menu_open> check in <open_attack> and <open_potions>. Menu can be only created during player's turn so there is additional <playerturn> check.
If player were to pick <to_map> button a proper pop-up would be created and <menu_mode> would be set to 3.
<to_map> menu as it's simple is handled by <combat_scene_behavior> in <when_the_mouse_is_pressed>. For potion and attack game uses <is_pressed_on_self> to move on with game logic.
Cancel button is important. Firstly because it allows player to change his mind. What is even more important that without it game can get stuck. This would happen if player picked potion option and had none to be used. If player pressed the cancel button <clean_up> triggers killing all buttons located in <menu_list>. Then <menu_open> is set to true meaning is it's ok for player to open menu since cancel button closed last one.
Battle (Player attack)
Events:
→ button_behavior → is_pressed_on_self
→ puppet_behavior → attack
→ puppet_behavior → deal_damage
Let's say we have attack/potion buttons open and we click on one of them. This triggers <is_pressed_on_self> of <button_behavior>. In case of attack we send information which attack has been chosen to <puppet_behavior> by setting up <number> attribute. If special attack was chosen we need to check if player has enough energy to perform special attack. For all types of attacks if everything went ok <is_pressed_on_self> triggers <attack> of <puppet_behavior> which handles player's attack. <clean_up> is triggered as well to kill menu actors.
In case of pressing potion firstly behavior checks if there is potion to be drunk. If yes action associated with potion drinking is performed. Number of potion is decremented since potion has been drunk. Information about successful potion drinking is given to player by setting up <tips> text attribute in <combat_scene_behavior>. Since player took his turn it's time for enemy to attack. This is done by triggering <enemy_turn> in <puppet_behavior>.
Warning: during writing this post bug has been found. After successfully drinking potion <player_turn> must be switched to false. Otherwise player would be able to open action menu in the middle of enemy attack.

<is_pressed_on_self> with comments and after bug fix
Player picked one of attacks and <attack> has been triggered. <attack> set <playerturn> to false and prevents player (human playing) from taking any more action until player and then enemy finishes their turns. <attack> triggers <move_player> which handles actual player attack.
Phases of <move_player>:
- Save starting position of body parts
- Rotate arm so it point at the enemy
- Stop rotation
- Move player towards enemy
- Deal damage to enemy and move back
- Reposition player at starting position
- Triggering enemy
It's important to reposition player at starting position after attack. Otherwise player could be doing "small steps" which could eventually make him walk out of screen. Breaking attack into many phases allows to deal damage as player is close enough to enemy.
Dealing damage is handled by triggering <deal_damage> event from <move_player>. Based on <attack_mode> attack set previously from <is_pressed_on_self> of attack button <deal_damage> event can decide which attack has been chosen. For normal attack its straightforward: random number between damage minimum and maximum damage is picked as damage. Number of damage is subtracted from enemy health. Text with information how much damage has been dealt is drawn on screen by setting <tips> text attribute in <combat_scene_behavior>. <combat_scene_behavior> behavior handles drawing the text.
When attack require chance test such as special or strong attack, chance test is first checked. Based on test result (passed or failed) <tips> text is set and proper amount of damage is dealt.
Battle (Enemy attack)
Events:
→ puppet_behavior → enemy_turn
→ puppet_behavior → to_map
→ puppet_behavior → reward
→ puppet_behavior → move_enemy
→ puppet_behavior → deal_damage_enemy
→ puppet_behavior → end_of_turn
Last phase in player attack is triggering <enemy_turn> which handles enemy_attack.
First enemy checks if it is alive. If enemy is dead <to_map> triggers with <win> equal 1. <to_map> creates end of battle menu and uses <win> to animate it ether as won or lost battle menu. If the battle has been won <max_level> can be updated. Game attribute <max_level> keeps as number biggest number of level that has been completed. <max_level> shouldn't be updated if player has finished already finished level. Winning level triggers <reward> event which updates <money> game attribute based on what level player has completed.
If enemy is still alive after player's attack <move_enemy> triggers handling enemy's attack. Logic of moving is the same as for player but different actors are moving (enemy body parts instead of player). Instead of <deal_damage> enemy triggers <deal_damage_enemy> which works as player's normal attack. <deal_damage_enemy> updates <enemy_text> text attribute which informs player about how much damage enemy has dealt. <move_enemy> ends with triggering <end_of_turn>.
<end_of_turn> checks if player is alive after enemy's attack. If player is dead <to_map> triggers with <win> equal 0 creating a lost battle menu. If player is alive <playerturn> is set to true allowing player to start next turn. Action toolbar switches animation so that attack and item buttons are visible. Information about last turn attacks is removed by setting <tips> and <enemytext> to empty text.
Help
My tutorials are intended for people who finished crash course of Stencyl. If any part requires deeper explanation be sure to ask in comments. Remember that there might be other people with similar problems to yours so by asking questions you are not only helping yourself but others as well.
If I were to ignore you for longer period of time PM on Stencyl forums or newgrounds.
This post might be a little mess since it's my second one using html and not Google editor. I'm new to html so if you think there might be a word missing in the text be sure to let me know about it.
If you have any suggestions put them in comments. I will take them into consideration for the future posts.
Thank you for reading.
Tags: Stencyl, Frankenstein, Turn-based, Strategy, RPG, LD33, LudumDare, Ludum, Dare, Monster
Subskrybuj:
Posty (Atom)